Pages


TECHNOLOGIS INFO

Technology Solutions, technologisinfo provides users with Mobile, Computer ,application and PC software.


TECHNOLOGIS INFO

Technology Solutions, technologisinfo provides users with Mobile, Computer ,application and PC software.


TECHNOLOGIS INFO

Technology Solutions, technologisinfo provides users with Mobile, Computer ,application and PC software.


TECHNOLOGIS INFO

Technology Solutions, technologisinfo provides users with Mobile, Computer ,application and PC software.

Tuesday, June 13, 2017

7 Ways To Free Up Disk Space on a MacBook

          7 Ways To Free Up Disk Space on a MacBook


Your Disk is Almost Full
It’s 2017, shouldn’t we stop worrying about disk space? Nope, not at all! A modern
MacBook might have a solid-state drive with just 128 GB of space,
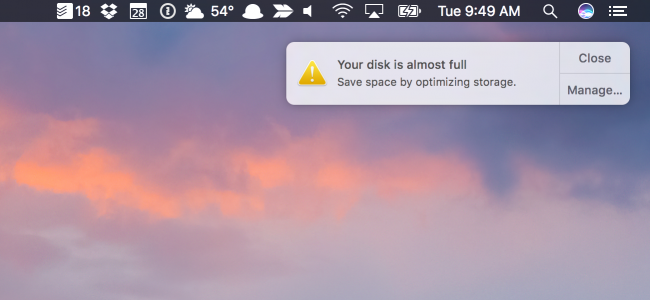
which means you’ll be seeing the dreaded “Your startup disk is almost full”
error sooner rather than later. It’s very important to keep your hard drive nice and clean.


Clean Up Your Mac the Easy WayYou can free up quite a bit of disk space by 
pruning away files and applications you don’t care about, but that will only get you so far. 
To really free up disk space on your Mac’s hard drive, you’re 
going to need to look a little deeper, like cleaning out language files 
you don’t use, removing duplicate files, deleting attachments, and clearing temporary files. 
Not everything  is obvious—did you know that each user account on a Mac has multiple Trash cans?
If you don’t feel like spending a bunch of time to find and clean things up manually,
you can use CleanMyMac 3 to get rid of temporary files, clean up extra language files,
uninstall applications, get rid of extra files left behind by application uninstallations,
find and get rid of big attachments stored in Mail, and a whole lot more.
It basically has all the features of the cleaning applications we talk about in this article,
but in a single app—with the exception of finding duplicate files, which you’ll still
want to use Gemini 2 for. Luckily it’s the same vendor that makes Gemini 2 and
you can get them both as a bundle.
And of course, there’s a free trial that shows where your free space has gone
and lets you clean up some of it for free.
CleanMyMac
They have a single button to clean up everything, but we’d recommend going into the details to make sure.
Note: before running any cleaning tool, you should make sure that all of
your important data is backed up, just in case.

Find and Remove Duplicate Files

One of the trickiest things that can take up lots of drive space are duplicate files
littering up your computer—this is especially true if you’ve been using the computer
for a long time.Luckily there are great apps like Gemini 2
that can be used to find and remove duplicate files with a really slick and easy interface.
You can buy it on the App Store if you want — Apple had this one as their Editors’
Choice, but you’re probably better off getting it from their website,
because they have a free trial available there.
There are a lot of other choices on the App Store and elsewhere, but we’ve used this one and
had good results.

Empty Your Trash Cans

To empty your user account’s main trash can, Ctrl+click or right-click the Trash icon
at the bottom-right corner of the dock and select Empty Trash. This will delete all the
files you sent to the trash from the Finder.The Trash on a Mac is equivalent to the Recycle
Bin on Windows. Rather than delete files form within the Finder, it’s sent to your Trash so
 you can restore it later if you change your mind. To completely remove these files and free
up the space they require, you’ll have to empty your Trash. But Macs can actually have
multiple trash cans, so you may need to empty several.
empty-trash-on-a-mac
iPhoto, iMovie, and Mail all have their own trash cans. If you’ve deleted media files
from within these applications, you’ll need to empty their trash cans, too. For example,
 if you use iPhoto to manage your pictures and delete them in iPhoto, you’ll have to
clear the iPhoto trash to remove them from your hard drive. To do this, just
Ctrl+click or right-click the Trash option in that specific application and select Empty Trash.
empty-delete-photos-from-iphoto-trash

Uninstall Applications

The applications you have installed on your Mac are taking up space, of course.
 You should uninstall them if you don’t need them—just open a Finder window,
select Applications in the sidebar, and drag-and-drop the application’s icon to the
trash can on your dock.
To find out which applications are using up the most space, open a Finder window
 and select Applications. Click the “Show items in a list” icon on the toolbar and
then click the Size heading to sort your installed applications by size.
view-size-of-installed-applications-on-mac

Clear Temporary Files

Your Mac’s hard drive probably has temporary files you don’t need. These files often
 take up disk space for no good reason. Mac OS X tries to automatically remove
temporary files, but a dedicated application will likely find more files to clean up.
 Cleaning temporary files won’t necessarily speed up your Mac, but it will free up
some of that precious disk space.
There are many temporary-file cleaning tools available for Mac. CCleaner,
the most popular temporary-file-deleting tool among Windows geeks, now
even has a version for Mac. Download the free CCleaner for Mac and run it to c
lear some of those useless files, just like you can on Windows.
clean-temporary-files-on-a-mac-with-ccleaner
Bear in mind that clearing your browser cache isn’t necessarily a good idea.
These caches contain files from web pages so your browser can load the web
pages faster in the future. Your web browser will automatically start rebuilding
the cache as you browse, and it will just slow down web page load times as your
browser’s cache grows again. Each browser limits its cache to a maximum amount
of disk space, anyway.

Check Your Disk to See What is Taking Up Space

To free up disk space, it’s helpful to know exactly what is using disk space on your Mac.
A hard disk analysis tool like Disk Inventory X will scan your Mac’s hard disk and display
which folders and files are using up the most space. You can then delete these space
hogs to free up space.
If you care about these files, you may want to move them to external media — for example,
 if you have large video files, you may want to store them on an external hard drive rather
than on your Mac.
Bear in mind that you don’t want to delete any important system files. Your personal
 files are located under /Users/name, and these are the files you’ll want to focus on.
analyze-disk-space-used-by-files-on-mac-os-x

Remove Language Files

Mac applications come with language files for every language they support. You can switch
 your Mac’s system language and start using the applications in that language immediately.
 However, you probably just use a single language on your Mac, so those language
files are just using hundreds of megabytes of space for no good reason. If you’re trying
 to squeeze as many files as you can onto that 64 GB MacBook Air, that extra storage
space can be useful.
To remove those language files, you can use Monolingual. This is only necessary
 if you really want the space—those language files aren’t slowing you down, so
keeping them is no problem if you have a big hard disk with more than enough free space.
remove-language-files-with-monolingual-on-a-mac

Clean Up Big Attachments in Mac Mail

You can change the Mail settings to not download attachments automatically to save space,
 or run a cleanup tool to get rid of them. If you’re using Gmail, you can set limits on how
 many messages are synced over IMAP by default to only show the last few thousand instead
 of everything.If you’re using the built-in Mail application in macOS and you’ve had the
 same email account for a long time, there’s a good chance that large email attachments
 are taking up a ton of space on your drive—sometimes many gigabytes worth, s
 o this is a good place to check while cleaning up your drive.

Use the Storage Tools in macOS Sierra

The latest version of macOS Sierra has a new tool to help you clean the junk out of your
Mac — just go to the menu and choose “About This Mac” and then flip over to the Storage tab.
About_This_Mac
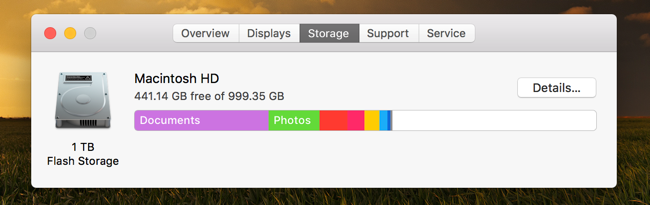
Once you are there, you can go through the new settings and enable the ones that make sense to you.
Store in iCloud – this new feature allows you to store your Desktop, Documents, 
Photos, and videos in iCloud and Apple will automatically free up local space as 
needed. If you’re on a slow internet connection, you probably don’t want to enable this.

Optimize Storage – the name doesn’t really match the feature, which basically 
deletes purchased iTunes movies and TV shows after you’ve watched them to 
keep them from cluttering up your drive. Since movies, especially in HD format,
 are extremely large files, this can help keep your Mac from running out of space. 
You can, of course, download them again any time if you’ve purchased them.

Empty Trash Automatically – this is fairly simple, if you turn this on 
Apple will automatically delete old items out of the trash after they have been in there for 30 days.
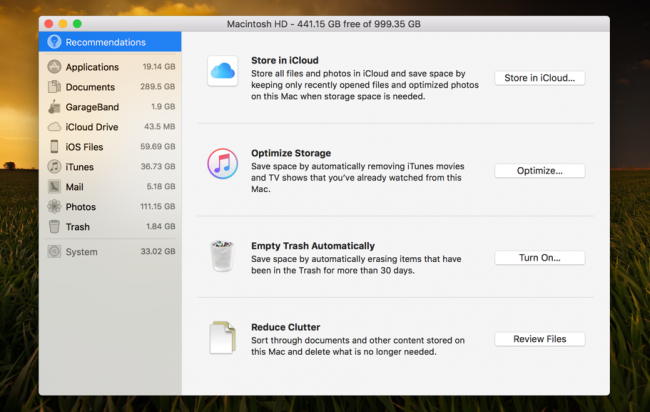
It’s a little clunky and not as easy to use as some of the third-party tools, but it does work

Monday, June 12, 2017

how to remove shortcut virus from pen with Shortcut Virus Remover

how to remove shortcut virus from pen with Shortcut Virus Remover

ABOUT SHORTCUT VIRUS REMOVER 3.1

Are you looking to remove shortcut virus from your pen drive? I got lots of issues regarding this removing shortcut virus. Exactly how it impacts on every single important computer file that we appreciate the most.
In case your laptop or computer, flash drive, as well as other mobile or portable devices, are affected, all of its data files might be hidden as well as not available until sometime that it gets to be corrupted as well as useless. Very bad, isn’t it?
The shortcut virus remover application uses Windows commands to delete the virus which creates shortcuts. When it’s launched the LNK files are removed from the computer and the virus deleted as well. You can run the shortcut virus remover for all the drives connected to the PC that is infected with the virus. Command prompt shortcut rever.

HOW TO REMOVE SHORTCUT VIRUS FROM USB AND FLASH DRIVE

Open Shortcut Virus Remover by Double-click on it. Download Here.
Shortcut Remover
Shortcut Remover
Then, It will give you two options “Pendrive” and “Computer“. You should choose Pen Drive.
Detected Virus
Detected Virus
First, select your pen drive path letter. My path is “I
After selecting your pen drive, You press “Scan” button to scan your pen drive.
Then Press “Delete” Option. Your files had recovered from your pen drive. Now, Check your pen drive.

27 Whatsapp tricks, tips,hacks and cheats

27 Whatsapp tricks, tips,hacks and cheats


Do you know the difference between awesome application and nasty application? Okey, let's talk about the only and only awesome messaging, SMS, texting and voice calling application "Whatsapp." Whatsapp is an application currently with more than 1.5 billion users and still pulls more people from abandoning other messaging Softwares such as Facebook Messenger, Viber, WeChat, Line, Telegram, etc. and using Whatsapp as the king of the Instant Messaging app. 

Do you know the tricks behind Whatsapp is what distinguishes it from other messaging applications?? 
I have tried my level best to gather the tricks, tips and hacks behind Whatsapp from various sources. You need to read them slowly and carefully because they define the functionality and superiority of the Whatsapp.

Note, this tutorial does not offer Whatsapp hacking tips but pranks or cheats to hack Whatsapp. Example, change your friend profile picture from your mobile device and much more.

Some of the best whatsapp tricks and hacks are:

1.Mute WhatsApp group chats and notifications on android,windows phone and PC


Group chat notifications can get sometimes noisy; they're best turned off when you have to focus on a task at hand.  

On AndroidWindows phone, you can turn off annoying group chats notifications by: tap the Menu button and hit Mute.  Then, choose the period for which you would like the group to be muted.  

Besides that, you can also disable notifications for a particular time. You can now enjoy this feature on WhatsApp for Pc too.  You can tap the group subject On iPhone ios to open Group Chat, to reveal the Group Info screen, and tap Mute. Then, select the duration for the notifications to be muted.

To scan for Cast-enabled devices, you must define a device scanner and register the delegate, then start scanning.


2.How can I tell who has read your message in a WhatsApp group


Note that, read receipts are marked by two blue ticks indicating that the recipient has received and read your message.
 How can I know if somebody has read my message on WhatsApp group?
 On Android phones, long press on a message sent by you Until an 'i' with a circle is revealed.
 Tap on it to see who received the message, and read by who.
 On iPhone, open a chat with a contact or a group to see the Message Info screen then swipe your message from left to the right to see delivery and read notifications.


3.Disable media Auto-Download to save on cellular bandwidth


WhatsApp Messenger lets their users specify what they would like be downloaded on either mobile data or when connected to Wi-Fi.
 On Android phones, navigate to Settings, and then Chat Settings, then Media Auto-Download to specify when you want images, audio and videos be downloaded to your cell phone. 
On iPhone navigate to WhatsApp Settings, and then Chat Settings > Media Auto-Download.


4.Modify profile photo, status message from the desktop


Currently, a new future has been added to WhatsApp Web that lets you tap on your avatar in the left-hand corner, to change your profile photo using a laptop camera or a webcam, or a photo on your drive. 
Also, this feature works with groups that you are an admin.


5.How to Disable the Last Seen and Read Receipts aka blue ticks on WhatsApp Messenger?


' By default, WhatsApp Messenger lets everyone know the last time you used the app. 
Your Last seen timestamp, profile photo and status message can be toggled among Everyone, My contacts, and Nobody in the Settings menu bar.
How to go about it.
Navigate to Settings > Account > Privacy on both iPhone and Android phones.
 Also, you can disable read receipts, notified by those Blue ticks but that means you won't be able to see 'read receipts' from other people.


6. Send a broadcast message to all your saved contacts through WhatsApp


The equivalent of sending your message to many people, it's much cheaper than sharing a group SMS.
 Note that, the replies from your broadcast will be visible only to you.

 On Android phone, Tap on Menu, New Broadcast, and then select all the contacts you would like to send the message. 

On iPhone Phones, Tap the Broadcast Lists button at the top of the Chats screen, tap New List at the bottom of the screen, filter from your contact list and then tap Create.


7.Migrate to a new number and import all your account information


This is another whatsapp cheats and tricks most people don't know. In case you change your SIM card, there's a way to import your account information, groups and settings. 
However, Keep in mind that your old number will be deleted. Make sure that your new SIM is active and able to receive SMS and phone calls. 

On Android phone, navigate to Menu, and then Settings, and then Account and finally Change Number. Enter the old cell phone number in the first text box, followed by the new number in the second one.

 On iPhone navigate to Settings, and then Account, and then Change Number, Enter your old phone number in the first text box, and your new phone number in the second text box.


8.Send voice message instead of typing


Sometimes you may experience the hardship of typing a message. In such a case you can send a Voice message, or let Google's speech to text engine, embedded in Google's keyboard do the transcription for you. iPhone users can press the little mic button to activate iOS dictation feature.


9.Explore significant hotspots around


Tap on the 'Send location icon' in the attachment pane
 to explore interesting hotspots around you. 
 You'll find everything from local tech startups to restaurants,
 marked as blue dots on the map.


10.Backup And Restore WhatsApp conversation


WhatsApp makes automatic backups of your conversation, but you can also make a manual backup.
 On iOS, navigate to Settings, and then Chat Settings, and then Chat Backup, then tap Back Up Now.
 On Android, just navigate to Settings, and then Chat Settings and Backup tap conversations to create a backup. 
However, it may not backup your media,
 but you'll need to use a file manager to copy the media folders in
 /sd card/WhatsApp/Media.  

Unluckily, there is no way to restore chats directly from WhatsApp, however, in case you want to restore a backup, you need to uninstall and reinstall WhatsApp Messenger again. 
When you start WhatsApp after the reinstall, you should be prompted to restore your most recent backup.

 Just follow the guideline given and your chats should all be back.


11.Create Shortcuts For Important Contacts to speed up WhatsApp communication


Want to quickly access your WhatsApp contact or group straight from your home screen?
  On Android phones, /long press on the group or contact you wish to create a shortcut.  After the menu pops up, tap on Add conversation shortcut.  This creates a shortcut to the contact or group you have chosen right on your home screen.  

This feature isn't available on 
WhatsApp for iOS, but you can use a third-party application such as 1TapWA, 
which brings the similar functionality on your iOS. 
Since it's an app, 1TapWA also has some extra features such as an image 
editor and an action scheduler.


12.Hide WhatsApp Images from being visible on Gallery Or Camera Roll


Displaying private WhatsApp images in your Gallery or Camera Roll 
can be very annoying, or you just don't like having
 these pictures clutter up your Gallery or Camera Roll.
 You can fix this on both iOS and Android.
 On iOS, it's pretty straightforward; just go to
 Settings > Privacy > Photos and then turn the WhatsApp switch off
On Android phone, you have to create a .nomedia file in WhatsApp's images or video directories.
You can use a file explorer such as ES File Explorer to navigate to the pictures or video folders.
 Then tap the New button on the lower left, pick File and create a file named .nomedia. 
This stops the Gallery from scanning the folder.


13.WhatsApp Messenger Installation On An Android Tablet


WhatsApp is built for both phones and PC and is intelligent 
enough to know when you’re trying to install it on a tablet.
 How to go about it.
Firstly, you need to download the latest version of the WhatsApp .apk.
 Visit their official site with Chrome or Firefox and request the desktop version of the site, 
which will allow you to download the .apk directly.
Run the AppGuard first. Select WhatsApp Messenger from the Dashboard then press Monitor.
Once the AppGuard is done setting up the monitoring, scroll down and disable read phone status and identity under Phone calls. 
WhatsApp should now run on your Android tablet. 
To activate WhatsApp, you can just use your landline and have WhatsApp call you with the three-digit verification code.


14.How to Change Your Friend’s Profile Picture?


You can alter your friend’s profile picture
 into your WhatsApp by using this new and an incredible
 prank to trick your pals. How to go about it.
Choose a profile picture for your friend.
 Resize the image to 561×561 pixels employing Paint or Photoshop,
 also, to name it with all your friend’s mobile telephone number. 
Save the image to SD and then greeting card WhatsApp 
and finally Page Pictures. Overwrite the current file (if necessary)
 and disable Wi-fi and data network. 
WhatsApp automatically updates the picture. 
Note: This may not be a hack or malicious activity, 
but just a prank to change your friend’s profile picture from your device. 
Thus WhatsApp for fun.


15.How to Use WhatsApp Messenger without your Mobile Phone Number


You can use Whatsapp without your number. This trick may help you do that easily, and activate WhatsApp that has a number which is not your spouse that is, fake.

 Just follow this procedure.
Uninstall WhatsApp from your phone device completely and download and install another one.
 Lock your messaging service by changing the airline to flight mode. 
Open WhatsApp to add your number. 
If you are not capable to deliver the message to the server, it will request you to choose an alternative strategy to verify. 
Choose to authenticate through message option and enter your email address and Click 'Send' selection and then swiftly click 'Cancel' to end the authentication.


16.Hide your WhatsApp Profile Picture


On matters concerning your privacy, or anything else, if you desire to hide your profile picture this trick will help you. Hiding WhatsApp Picture options are available for the current version of WhatsApp. 

In case, this feature is not available on your WhatsApp, then obtain the latest version which is always available for free.

How to go about it:
Navigate to Settings and then Account privacy.
Then select from among the three options
Everyone-Visible to the public by anyone
My Contacts- Only visible to whom their contacts a are saved on your phonebook.
Not anyone- Totally invisible to anyone.Only visible through your phone.


17.Disable media files From downloading to your camera roll


On WhatsApp for iOS, go to Settings, and then  Chat Settings, and then toggle between on and off to disable the “Save Incoming Media” option. 
This prevents WhatsApp from downloading the media content to your Camera Roll.


On Android Phones, Navigate to where WhatsApp Media files are on your storage and then check the folder in which you want to prevent Whatsapp media files downloaded to. Either connect the phone to the computer and browse through the folders or you can use a file explorer application on your device. If you’re using a file explorer on the phone, navigate to sd card and then WhatsApp and then Media. Select one of the folders and rename it. For instance, “WhatsApp Images”, rename it to “.WhatsApp Images”. The period added to the folder’s name hides it, and will no longer be visible in the Gallery application.


18.Send Chats to your Email


This another feature available for WhatsApp and also fascinating. 
In fact, you can send all your Conversation to your email very quickly. 
After sending you can see all media files and text on your email. 
How to go about it.
Open any chat, click on the left option key and then click more and then Email Conversation.


19.WhatsApp installation and Setting up


Setting up WhatsApp is simple in itself. Download and install the app from the app store, and then open up the WhatsApp Messenger app. You will be prompted to input your country code, and phone number to confirm your number and create your user account. 
Meaning that WhatsApp requires a SIM card and phone number, so tablets without SIMs won't be able to run this app. After receiving the confirmation SMS, you'll be prompted to enter a username and a picture. Finally, you're all set! 
WhatsApp then checks which of your contacts are using the service based on their phone numbers, so you won't have to mess manually around inputting or importing new contacts. From the main screen, you can tap the messaging icon to begin a new conversation, or look through your history of previous chats.


20.Sending Voice Messaging


Voice Messaging is a new feature to Whatsapp Messenger, allowing users to send audio messages as part of the chats.

How to go about it:
 From within a chat, Hold down on the mic icon to start recording, and release to send the voice message. On Blackberry devices, Hold down the Space bar, On Nokia hold down the center button. To cancel the audio recording, slide from the mic button to the cancel button. Once it is conveyed, the recipient can play the audio through your earbuds, phone speaker, or loudspeaker. Unlike other media files that can be attached to a WhatsApp message, voice messages will always be downloaded by the recipient's phone, whether on WiFi or not, so consider your voice messages length on the off chance you're chewing through your contact's data. You can send media and images, with voice messaging.


21.Group Chat


For a more interactive and group conversation, you can also create a group chat. 
Steps:
On WP8 and Android phones, tap the menu button (symbolised by three dots) and select 'New Group.'
 On Blackberry phones, navigate  to 'Chats' tab, press the Blackberry button and  select 'New Group Chat.' 
On iOS phones, tap on 'New Group' at the top of the 'Chats' screen.
  After creating a new group, then provide a title for the chat and a group chat icon visible to all which is optional. After that, add members to the chat group who can then contribute chatroom style and share media or voice messages. Note that, The creator of the group becomes the group admin, with the ability to add new participants or exception existing ones. You may also abandon the group at your own time by navigating to the 'Chat' screen, select the group, and deleting it to leave the conversation. If the group admin exits, a random user becomes the new admin.


22.Customizing Wallpaper


You can customize the background wallpaper displayed on your phone. Navigate to Settings and then Chat Settings 
Click the Wallpaper to select a new wallpaper from your gallery, photo roll or your phone's local storage.


23.WhatsApp popup notifications trick


Things to do on any device is navigate to WhatsApp's Settings and then Notifications and then enable popup notifications.

 Note that, you can have popups for either an illuminated screen (your cell phone is on) or when your mobile phone is off. If you go for this option, A notification message pops up even if the screen is in sleep mode but remain on your lock screen until you unlock your phone, as shown below. 


24.WhatsApp widget on stock Android


In a case your device is running on a custom ROM that supports lock screen widgets, you can swiftly add custom widgets, including WhatsApp, to your lock screen. If you're using an Android 4.4 KitKat based ROM, just navigate to Settings and then Lock screen and check the box for Custom Widgets. 


Then, lock your device's screen and from the lock screen swipe to the side until you see the + symbol. Tap and select WhatsApp from the list among other apps. In case you unlock your cell phone from the lock screen with the WhatsApp widget installed, the next time you Unlock your phone screen then WhatsApp widget will appear as the ''default''. Note that, Older and newer versions of Android don't support lock screen widgets. 


25.WhatsApp widget on Galaxy phone devices


Samsung like all OEM skins uses a different menu setup but customizing your screen lock widgets is very straightforward. Galaxy devices which are running KitKat versions of Android give you the capability to set up lock screen widgets just like stock Android. Besides, you can add a WhatsApp shortcut to your screen lock as per your preference. However, Android Lollipop killed lock screen widgets on Galaxy devices too.

Steps:
 Navigate to Settings and then Lock screen and then Lock screen options. 
Then turn on the Shortcuts switch. 
Tap the Shortcuts link and choose WhatsApp from the list.


26.Get extra information on messages (on delivery and seen)


You probably chat with your friends without realizing that you can reveal a bit more information about the delivery of your messages and when they were seen. 
On iOS phones,  Swipe left on a certain conversation entry to see when it was delivered and read. 
On Android phones, Tap and hold on a particular message, and then tap the Info button symbolized by encircled "i" to get the relevant screen. 
This will help you know whether your friends are ignoring you or not.


27.Tricks and cheats behind whatsapp Sharing of your location


Your friends’ discovering your location can come in handy in all kinds of situations.
 In case you want to broadcast your whereabouts on iOS phones, tap the Share button at the bottom left of the chat then select the Share Location from the list. Same applies to Android phones and Windows Phones
You can opt to enter an address or the map pin using the top search bar. 

On Android phones, tap the attachment icon that resembles a paperclip in the top bar of each chat screen. Select Location from the drop-down menu. 

 Besides that, you can opt to send your position using GPS, choose from a list of places or search on the map.

Wednesday, June 7, 2017

Find Windows Product Key – Script

Find Windows Product Key – Script

If you don’t want to download any software, you can simply create a script that will return the value of the product key. In order to create the script, you need to first open Notepad. Then, copy and paste in the following code:
Set WshShell = CreateObject("WScript.Shell")
 MsgBox ConvertToKey(WshShell.RegRead("HKLM\SOFTWARE\Microsoft\Windows NT\CurrentVersion\DigitalProductId"))
Function ConvertToKey(Key)
 Const KeyOffset = 52
 i = 28
 Chars = "BCDFGHJKMPQRTVWXY2346789"
 Do
 Cur = 0
 x = 14
 Do
 Cur = Cur * 256
 Cur = Key(x + KeyOffset) + Cur
 Key(x + KeyOffset) = (Cur \ 24) And 255
 Cur = Cur Mod 24
 x = x -1
 Loop While x >= 0
 i = i -1
 KeyOutput = Mid(Chars, Cur + 1, 1) & KeyOutput
 If (((29 - i) Mod 6) = 0) And (i <> -1) Then
 i = i -1
 KeyOutput = "-" & KeyOutput
 End If
 Loop While i >= 0
 ConvertToKey = KeyOutput
End Function
Now click File and then Save As. To save the file as a script, you need to add .vbs to the end of the file name and you need to choose All Files for the Save as type box.
save script
Click Save and now go to the folder where you saved the script. Double-click to run it and you should get a small window with your Windows product key.
product key script
This script is short and doesn’t give you any other info about Windows. If you need to know what edition of Windows you have installed, just open the Control Panel and click on System. At the top, it’ll tell you the edition.
windows edition
So those are two easy ways to get your product key for Windows. As mentioned earlier, Windows 10 no longer has a product key, so it’s a good idea to get your key before you upgrade Windows 7 or 8. If you’ve already upgraded your machine, you should be able to reinstall Windows 10 (the same edition) on that machine without needing to reactivate or enter any product key.
If you replace too many parts on your computer or your computer dies and you want to move it to another computer, you can either reinstall Windows 7 or 8 before July 29, 2016 and upgrade or you will have to call Microsoft and hopefully they’ll allow you to activate Windows. If you have any questions, feel free to comment. Enjoy!

Tuesday, June 6, 2017

Best Google Magic Keywords & Tricks


            Best Google Magic Keywords & Tricks

  1. ZERG RUSH-  Click & Watch
  2. DO A BARREL ROLL-  Click & Watch 
  3. GOOGLE MIRROR-  Click & Watch
  4. GOOGLE UNDERWATER-  Click & Watch
  5. GOOGLE GUITAR-  Click & Watch
  6. GOOGLE SPACE-  Click & Watch
  7. BLACKLE-  Click & Watch
  8. EPIC-  Click & Watch
  9. EPIC GOOGLE- Click & Watch
  10. PACMAN-  Click & Watch
  11. GOOGLE SPHERE-   Click & Watch
   ZERG RUSH                             DO A BARREL ROLL

zerg rushdoabarrelroll


GOOGLE MIRROR

Google Mirror
GOOGLE UNDERWATER

Google Underwater

GOOGLE GUITAR

Google Guitar

GOOGLE SPACE

Google Space
BLACKLE

Google Energy Saving


EPIC

Epic Google


EPIC GOOGLE

Weenie Google


PACMAN


GOOGLE SPHERE


Share Post